| << Chapter < Page | Chapter >> Page > |

Figure 2 also shows the necessary power-supply connections (DVCC, DVSS), programmer/debugging tool connections (SBWTCK, SBWTDIO), and general I/O and peripheral connections (P3.1, TA1.0, CA2, UCB0SDA). When beginning any design with the MSP430 MCU, reviewing the given device’s block diagram and package pinout can provide a great guide to what is possible, as well as any constraints (such as memory size or pinout limitations).
Connecting the MSP430 MCU in any system is, in most cases, very straightforward. The first consideration should be the power-supply requirements. Most MSP430 devices operate at 1.8 V to 3.6 V, so a typical 3-V supply will work great. Connecting the JTAG to support device memory programming and debugging is also important. For MSP430G2xxx devices, there are two possibilities: standard four-wire JTAG or MSP430 MCU-specific Spy-Bi-Wire (SBW, or two-wire JTAG). Both interfaces are acceptable for programming and debugging application code. The main advantage of the four-wire mode is speed. The main advantage of the two-wire SBW mode is reduced pin-connection requirements.
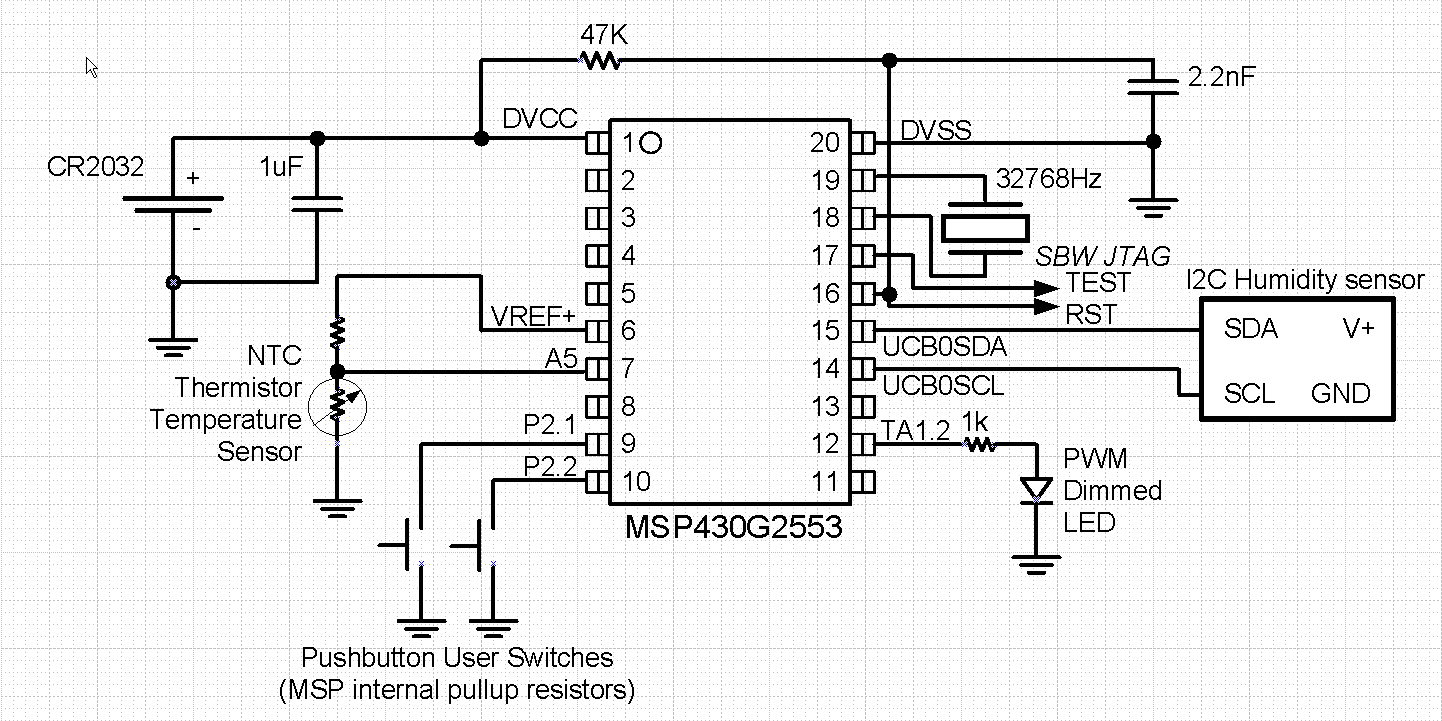
Figure 3 is an example schematic thatshows the baseline connections for the MSP430G2553, as well as some examples of other connections that can be made to the I/Os and integrated peripherals.

Figure 3 shows the connections of the MSP430G2553 in a typical sensor interface application. In this example, the MSP430G2553's integrated ADC10 is used to measure an analog signal via a thermistor that changes resistance as temperature increases or decreases, and also interfaces using an I2C bus from the USCI module to an external humidity sensor. In addition, a 32.768-kHz watch crystal keeps accurate timing; two switches, along with one PWM-controlled LED, provide a simple user interface. To save power from the 3-V coin cell battery, when not in use the humidity sensor and thermistor ladder can be powered off using a general-purpose I/O (P2.5) and the internal voltage reference (VREF+), respectively.
Now that we've covered the basics and how to understand the capabilities of a given MSP430 device, let’s look more closely at the documentation and how to use it most effectively. MSP430 device documentation can be broken up into three main categories:

Notification Switch
Would you like to follow the 'Senior project guide to texas instruments components' conversation and receive update notifications?