| << Chapter < Page | Chapter >> Page > |
Virtual images are images formed in places where light does not really reach. Light does not really pass through the mirror to create the image; it only appears to an observer as though the light were coming from behind the mirror. Whenever a mirror creates an image which is virtual, the image will always be located behind the mirror where light does not really pass.
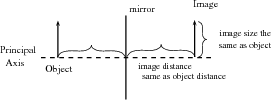
A virtual image is upright, on the opposite side of the mirror as the object, and light does not actually reach it.
We draw ray diagrams to predict the image that is formed by a plane mirror. A ray diagram is a geometrical picture that is used for analyzing the images formed by mirrors and lenses. We draw a few characteristic rays from the object to the mirror. We then follow ray-tracing rules to find the path of the rays and locate the image.
The ray diagram for the image formed by a plane mirror is the simplest possible ray diagram. [link] shows an object placed in front of a plane mirror. It is convenient to have a central line that runs perpendicular to the mirror. This imaginary line is called the principal axis .
Ray diagrams
The following should be remembered when drawing ray diagrams:
Method: Ray Diagrams for Plane Mirrors
Ray diagrams are used to find the position and size and whether the image is real or virtual.


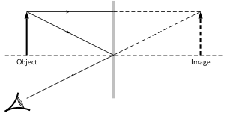
Suppose a light ray leaves the top of the object traveling parallel to the principal axis. The ray will hit the mirror at an angle of incidence of 0 degrees. We say that the ray hits the mirror normally . According to the law of reflection, the ray will be reflected at 0 degrees. The ray then bounces back in the same direction. We also project the ray back behind the mirror because this is what your eye does.
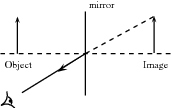
Another light ray leaves the top of the object and hits the mirror at its centre. This ray will be reflected at the same angle as its angle of incidence, as shown. If we project the ray backward behind the mirror, it will eventually cross the projection of the first ray we drew. We have found the location of the image! It is a virtual image since it appears in an area that light cannot actually reach (behind the mirror). You can see from the diagram that the image is erect and is the same size as the object. This is exactly as we expected.

Notification Switch
Would you like to follow the 'Siyavula textbooks: grade 10 physical science' conversation and receive update notifications?