| << Chapter < Page | Chapter >> Page > |
The Explorer is an indispensable tool in an operating system, since with it we can organize and control the files and folders of the different storage systems at our disposal such as the hard drive, disk drive, etc.
The Windows Explorer is also known as the File Manager. Through it we can delete, see, copy, or move files and folders.
The quickest way to start up the Explorer is through the icon
![]() on the task bar or desktop. If you don't already have the icon created, you can open the Explorer as follows:
on the task bar or desktop. If you don't already have the icon created, you can open the Explorer as follows:
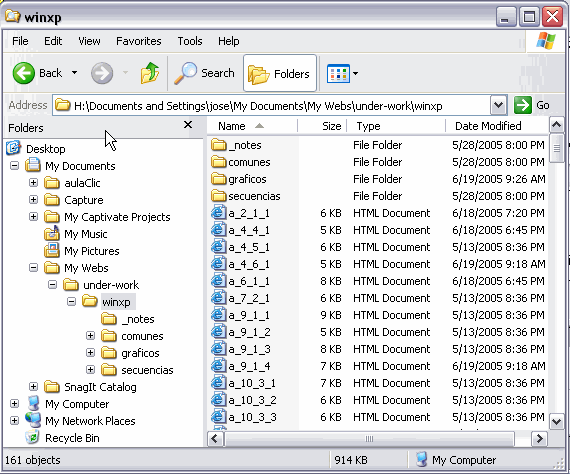
The explorer consists basically of two sections. On the left side there is the directory tree, which is the list of units and folders that we have. Only units and folders appear, no files. On this image we can see a few folders such as My Documents, aulaclic, ... the My Computer icon, My Network Places and the Recycle Bin.

On the right side there is another section, which will show the content of the folder that we have opened on the left section. This section shows its folders and files. In this case the files that are contained in the folder WinXP appear. Depending on the type of view that we have activated we will see different type of information regarding the files.
Next we will explain the different bars that make up this window.

The standard bar contains the buttons for the most used operations.
If this bar is not visible select from the menu View, the option Toolbars, next select the option Standard buttons.
The Back button
![]() will allow us to go to the last page that we have seen. The button next to it, when activated, allows us to move one page forward.
will allow us to go to the last page that we have seen. The button next to it, when activated, allows us to move one page forward.
The up button
![]() will allow us to go up one level, which means going back to the folder that contains the folder we are working with.
will allow us to go up one level, which means going back to the folder that contains the folder we are working with.
The search button
![]() displays a window where we can search for the file we want.
displays a window where we can search for the file we want.
The folders button
![]() shows the folder's structure on the left side of the screen, or it can display an area with the most frequent tasks, depending on the file we have selected. In this area we can find, among others, the following buttons:
shows the folder's structure on the left side of the screen, or it can display an area with the most frequent tasks, depending on the file we have selected. In this area we can find, among others, the following buttons:
The last button
![]() allows us to change the views on the folders (view details, Thumbnails,...) We'll explain this in more detailed on the next page.
allows us to change the views on the folders (view details, Thumbnails,...) We'll explain this in more detailed on the next page.

The Address Bar is well known for Internet because it shows the address of the web we are viewing. With Windows Explorer it functions the same way, but it shows the name of the folder we are working with.
If we click on the black arrow it will show the structure with our computer's drives.

Notification Switch
Would you like to follow the 'Introduction to computer science' conversation and receive update notifications?