| << Chapter < Page | Chapter >> Page > |
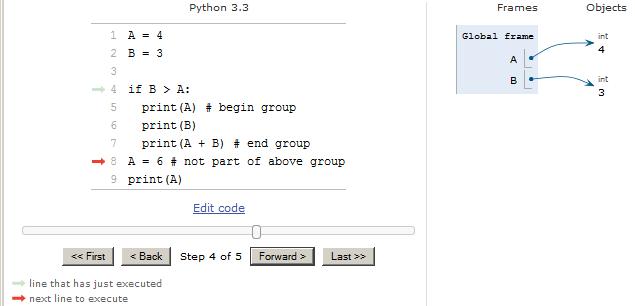
Figure 4 shows the same situation using the code from Listing 2. instead of the code from Listing 1 .
Figure 4. Same situation, different code.

Note that the values stored in the variables named A and B were reversed relative to the code in Figure 3 . As a result, the if statement pointed to by the green arrow returned false instead of true when that statement was executed. Because of that, execution ofthe indented code block following the if statement will be skipped entirely and the red arrow now points to the statement immediately following that code block.That is the next statement that will be executed.
As you use the Forward and Back buttons to step through the code, one instruction at a time, you can observe the red and green arrows to gain a betterunderstanding of the flow of control through the program. (You will learn more aboutflow of control in future modules and you will probably find that the code visualizer is particularly useful when analyzing that code.)
If you are in a hurry, you can press the First button and the Last button to cause the code visualizer to go the first or last instruction in one step.
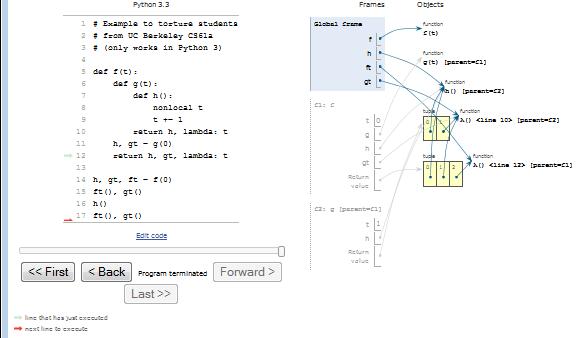
There are links to quite a few sample programs below the drop-down boxes shown in Figure 1 . (I cropped them out of Figure 1 to save space.) One of those sample programs is named student torture .
As a preview of things to come, Figure 5 shows the result of opening that program in the code visualizer and pressing the Last button.
Figure 5. The student torture program.

Finally, there is another interesting sample program at (External Link) that you can step through and observe its behavior. While you are there, be sure to note your ability to share the code visualizer with a friend or a tutor on anothercomputer on the Internet and jointly analyze a program.
I encourage you to use the code in Listing 1 and Listing 2. along with the code visualizer to repeat theprocedures explained in this module. Confirm that you get results similar to those shown in Figure 3 and Figure 4 .
Change the options in the drop-down boxes and observe the results.
Experiment with the code, making changes, and observing the results of your changes. Make certain that youcan explain why your changes behave as they do.
As mentioned earlier, I strongly recommend that from this point forward in this course, you copy and paste every sample program into the code visualizerand observe the behavior of that code as you step through the program, one instruction at a time. I believe that doing that will help you to betterunderstand Python programming.
This section contains a variety of miscellaneous information.
Financial : Although the Connexions site makes it possible for you to download a PDF file for thismodule at no charge, and also makes it possible for you to purchase a pre-printed version of the PDF file, you should beaware that some of the HTML elements in this module may not translate well into PDF.
I also want you to know that, I receive no financial compensation from the Connexions website even if you purchase the PDF version of the module.
In the past, unknown individuals have copied my modules from cnx.org, converted them to Kindle books, and placed them for sale on Amazon.com showing me as the author. Ineither receive compensation for those sales nor do I know who does receive compensation. If you purchase such a book, please beaware that it is a copy of a module that is freely available on cnx.org and that it was made and published withoutmy prior knowledge.
Affiliation : I am a professor of Computer Information Technology at Austin Community College in Austin, TX.
-end-

Notification Switch
Would you like to follow the 'Itse 1359 introduction to scripting languages: python' conversation and receive update notifications?