| << Chapter < Page | Chapter >> Page > |
The Cartesian coordinate system The position of sprites on the Stage in the Scratch programming interface is based on a two-dimensional Cartesian coordinate system with the origin at the center of the Stage. The x coordinates range from-240 at the left to +240 at the right. The y coordinates range from +180 at the top to -180 at the bottom.
The area below the stage in Image 4 shows that this program contains two beachballs and one basketball in addition to the Stage. (The beachballs and the basketball are sprites.)
You add a sprite to your program by clicking one of the four buttons immediately below the stage.If you hover your mouse over those buttons going from left to right, the following tooltips appear:
In this program, the beachballs and the basketball were added by selecting the first or leftmost button in the row of four buttons and then selecting theappropriate sprite from the library.
Although not visible in the cropped version of the programming interface in Image 4 , when you click on one of the sprites that you have added to the program, thatsprite appears at the top of the rightmost pane. (See Image 6 for example.) Having done that, you can then drag programming blocks into the rightmost pane that define the behavior of thatsprite.
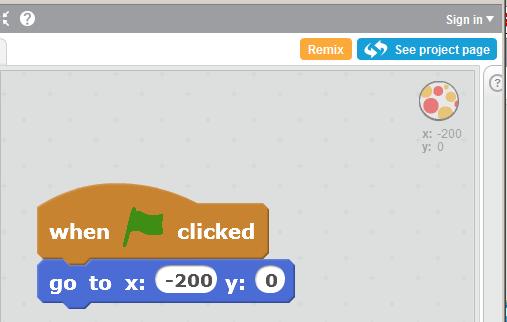
The code that I wrote (by dragging blocks into the rightmost pane in the programming interface) for the sprite named LeftBeachball is shown in Image 6 . (Note the image of the beachball in the upper right corner. When this is an image of a beachball, all of the scripts in the rightmost panel apply tothat particular beachball sprite.)

You are already familiar with the tan block with the green flag shown in Image 6 because you learned about it in a previous module. However, theblue block in Image 6 has not been used prior to this module.
The blue block shown in Image 6 was added to the program module by:
If you move the mouse pointer around the stage in the programming interface, the coordinates of the mouse pointer are displayed immediately below the stage as shown in Image 4 . As mentioned earlier, the xcoordinates range from -240 at the left to +240 at the right. The y coordinates range from +180 at the top to -180 at the bottom.
The behavior of the script shown in Image 6 can be interpreted as follows: When the user clicks the green flag, cause the sprite named LeftBeachball to move to a location with an x (horizontal) coordinate value of -200 and a y (vertical) coordinate value of 0. Since the origin is at the center of the Stage, this causes the beachball to move to theleft of the origin on the horizontal axis.

Notification Switch
Would you like to follow the 'Teaching beginners to code' conversation and receive update notifications?